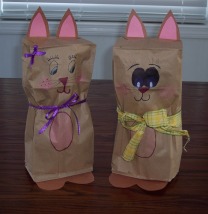
Description
Get into the Easter spirit by crafting this Easter Bunny from simple paper lunch bags. Children will love this easy kids Easter craft!
Materials and Supplies
Craft Supplies:
- 2 Paper lunch bags
- Tissue paper or newspaper
- Glue stick
- White glue
- Crayons and/or markers
- Pompom pink or white
- 30" piece of ribbon
- Pink and brown construction paper
Craft Instructions
- Trace and cut out feet and ears from brown constructions paper. Cut two inner ears from pink constructions paper.
- With a glue stick, glue the long straight edge of the feet to the bottom of one bag with the rounded part of the feet extending past the edge of the bag.
- Gently crinkle tissue paper or newspaper and use it to stuff this paper bag.
- Holding the second paper bag upside down, draw a face on the upper half of the bag using markers and/or crayons. I used a combination of both. Be sure you draw on the side that does NOT have a flap when the bag is folded.
- Draw an oval on the lower half of this bag on the same side as your bunny's face. This will be the bunny's belly.
- Slide the second bag (the one with the face) over the first bag (the stuffed one) and tie the ribbon around the neck area to give your bunny some shape.
- Glue the inner ears to the center of the ear pieces with a glue stick. Then glue the lower edge to the back of the bunny's head as pictured.
- With white glue, glue a pompom to the back of the bunny as a tail.
Optional: Glue a bow on top of the head for a girl bunny.
Variation: Use white or pastel lunch bags instead of brown. White and colored lunch bags can be found at Oriental Trading as well as many craft and party stores.