
Description
Learn to make your very own window clings. Here we will teach you the technique and provide a pattern to make fall leaves that cling to the window. Let your imagination run wild and make window clings for any occasion.
Materials and Supplies
Craft Supplies:
- One bottle of Leading Paint (Does not actually contain lead)
- Styrene blank/Leading blank (a clear plastic sheet used to paint on)
- Paint in a variety of fall colors such as red, orange & yellow*
*Different companies make the paint for window clings. Each company uses a different name for this type of paint. I have used both Liquid Rainbow paints by Deco Art and Gallery Glass by Plaid. For this project, I like to use the Liquid Rainbow paints but they are not as readily available in our local stores. They can be ordered online direct from Deco Art. The Liquid Rainbow paints are more watery which allows them to blend more naturally producing a nice effect when making fall leaves. The Gallery Glass does not dry as translucent and does not mix well but for projects requiring a more solid color they work great.
Craft Instructions
These directions are written for use with the Liquid Rainbow paint. Read the labels on the paints if you use a different brand. The dry time etc. is different.
1) Place your pattern under the styrene blank.
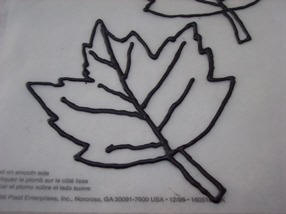 2) Trace the pattern directly on the styrene blank with the leading paint. Hold the bottle of paint similar to how you would hold a pen or pencil. Do not touch the tip of the bottle to the work surface. Instead, hold it slightly above the styrene blank and move in a smooth steady motion applying gently pressure on the bottle as you go. The leading paint acts to contain your colors. Be sure when you are outlining your design the start and finish lines on your drawing connect completely. If there is any gap in your outline, the paint will flow out of your design.
3) After you have traced the outline of the leaf onto the styrene blank, use the leading paint to draw some veins in the leaves. Let dry 1 - 2 hours.
 4) Use your Liquid Rainbow paint colors to fill in your design. When using the filler paint, it is important that you do NOT shake the paint. If you do, you will have lots of air bubbles. Hold the tip of the bottle just above the surface and gently squeeze the paint into the area you want to fill moving the tip side to side. It is important that you fill the outlined areas with the paint until the paint is level with the leading. Also, be sure the area is completely filled and there are no gaps between the leading and the paint as this will create holes in your finished project. To achieve the multi color look of the fall leaves, fill the outlined areas with a variety of colors such as red, orange, and yellow then, let them ooze into each other. I like to fill the stem in with brown paint. The look of the paint changes dramatically as it dries.
5) If using the Liquid Rainbow paints let dry a minimum of 24 hours (depending on humidity) before removing them from the styrene blank and placing them on windows. The drying time varies depending on what brand of paint you are using and what the humidity is. Check the label for details. Plaids Gallery Glass takes approximately 8 hours to dry.
Hints:
- Do not shake the paints. This will cause many air bubbles. If you must shake the paint because it has been stored for an extended period of time and has separated, let the paint sit for at least a couple of days before using it allowing the air bubbles settle down.
- Release pressure on the leading bottle just before you want to stop to achieve a clean outline.
- Let your imagination run wild and make window clings for every season and holiday.
- Don't limit your designs to windows. Try putting some on mirrors or other smooth surfaces. However, it is not recommended to put them on painted walls or furniture.
- Window clings can be saved from year to year if stored properly. I like to place them inside plastic sheet protectors. If you place one on top of another, they will stick together and you risk permanent damage to your creations.
- If your window gets cold and the cling feels brittle, warm them slightly with a blow dryer set on warm - NOT HOT - before removing them from the window.