Description
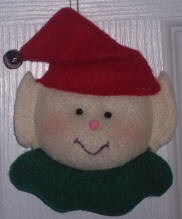
Learn to make an elf Christmas ornament from felt with our full size pattern and free sewing instructions. Our elf Christmas ornament has a soft sculpted face and lots of character. He is a unique design created by the team at Craft Elf. Make some elves for your Christmas tree or make a set to give as gifts to friends and loved ones.
Materials and Supplies
Craft Supplies:
- Red Felt; 4" x 7" piece
- Green Felt; 4 1/2" x 2" piece
- Flesh colored felt: 3 1/2" x 9" piece
- One 10mm bell
- One 5mm pink pom-pom
- Two black glass E beads
- Tacky glue
- Small amount Polyester Fiberfill (stuffing)
- 8" piece of elastic thread or crochet thread
- Powdered blush
- Ultra fine tip black permanent marker
- Needle & thread
- optional: sewing machine and gold glitter glue or fabric paint in a squeeze bottle
Craft Instructions
- Trace and cut out two hat pieces from red felt. Trace and cut out one collar piece from green felt and trace and cut out two heads from flesh colored felt.
- Pin the two head pieces together and sew around the face close to the edge leaving the top section opened. Topstitch around the ears.
- Stuff the head with Polyester Fiberfil (stuffing). Only the face will be stuffed - the ears will not get stuffed. Then, sew the opening at the top of the head closed. Set aside.
- Pin the two hat sections together and stitch the two sides close to the edge leaving the bottom edge opened. Right side out the hat and place it on top of the elf's head. Stitch in place.
- Fold down the top of the hat as pictured and tack in place with a couple of stitches on the back side of the ornament. Sew a bell to the tip of the hat.
- Hand-stitch the collar to the lower portion of the head.
- Brush powdered blush on the cheeks of the elf. Sew the two black beads on for eyes. Glue the pink pom-pom on as the nose and using the permanent marker, draw a mouth.
- Thread a piece of elastic thread or crochet thread through the back of the elf's hat using a needle with an eye large enough to pass the thread through. Remove the needle and tie the ends in an overhand knot. This will be your ornament's hanger.
Optional: Personalize your ornament by writing the recipients name on the collar using the glitter glue or fabric paint in a squeeze bottle.